Windows 7 change adapter settings. How to install a network adapter
1. Open Device Manager. To do this: Click "Start" –> "Settings" –> "Control Panel" –> "System". Select the "Hardware" tab. Click "Device Manager". In the window that appears, expand the "Network cards" branch by clicking on the [+] to the left of it.
2. Left-click the wired network adapter ("Realtek...")
Click on the right mouse button and select "Properties".

Make sure this device is in use (turned on) and working properly. If it is off, turn it on ("Device use").

3. Select the Power Management tab.
4. Uncheck the box "Allow the computer to turn off this device to save power". Click OK. Close all tabs.

5. Open the "Start" menu –> "Settings" –> "Control Panel". Double click on the " Network connections".

6. Right-click on "Connect via local network and select "Properties" in the window that appears.

7. Highlight by clicking on the text, "Internet Protocol (TCP/IP)". Do not uncheck this line.
8. Click on the "Properties" button below.
Often there is a situation where correct connection router or modem to a PC in the lower corner of the computer monitor there is no "windows 7 wireless network connection" icon. And no matter how much the user switches wires, stubborn "network connections" never appear. In this case, it is necessary to postpone the “cable work” for a while and check (and possibly reinstall) the LAN connection settings.
Windows 7 network connection setup
- 1. Click the left mouse button (then all the time with the left, unless otherwise indicated) the Start menu button.
- 2. Select the "Control Panel" icon.
- 3. In the "Control Panel" click "Network and Internet" - "View network status and tasks" (if you do not see it, switch the view mode to the "Category" view).
4. Go to the "Change adapter settings" menu.

5. Right-click on the "Local Area Network Connection" icon, select "Properties" from the context menu.

6. Double-click to expand the properties of "Internet Protocol version 4 (TCP / IPv4)".
7. We switch the first checkbox to the position: “Obtain an IP address automatically”, the second to “Obtain a DNS address of the north automatically”.

8. If the checkboxes were already in the specified position, then change the first one to the position: “Use the following IP address”.
We set the following values: "IP address": 192.168.1.2, "Subnet mask" 255.255.255.0, "Default gateway": 192.168.1.1; "Preferred DNS server': 192.168.1.1.

Do not forget to click the "OK" button in all open windows after the settings are completed to save the settings.
Setting up a network connection in windows 8:
In general, setting the connection parameters here is carried out similarly to the previous version of the OS. The only caveat: many users do not know how to open network connections in windows 8. Therefore, on this stage let's go into more detail:
1. Right-click on the "Start" menu and in the menu that appears, select "All applications"

2. In the "Applications" menu, click the "Control Panel" icon.

3. Click on the "Network and Internet" icon.
5. Find and click "Change adapter settings" (top left).
Further configuration is carried out similarly to the "seven": follow steps 5 to 8 and check the network connection - the corresponding icon should appear in the lower corner of the monitor.
This article shows the steps to enable or disable the network adapter(s) in the operating system. Windows system 10
Network adapter(Network Interface Card, NIC) is a computer hardware component that connects the computer to computer network, known as a network connection, allows your computer to communicate with other devices on a network.
To enable or disable a network adapter, you must be logged in as an administrator
CONTENT:
1
How to enable or disable a network adapter using "Network Connections"

In the "Network Connections" window that opens, to disable the network adapter, right-click on the desired network adapter and in the appeared context menu select Disable

To enable a network adapter, in the "Network Connections" window, right-click on the desired (disabled) network adapter and select Enable from the context menu that appears.

How to enable or disable the network adapter using the "Device Manager"
To disable the network adapter, in the Device Manager window, expand Network adapters, then right-click on the network adapter you want to disable and from the context menu that appears, select Disable device
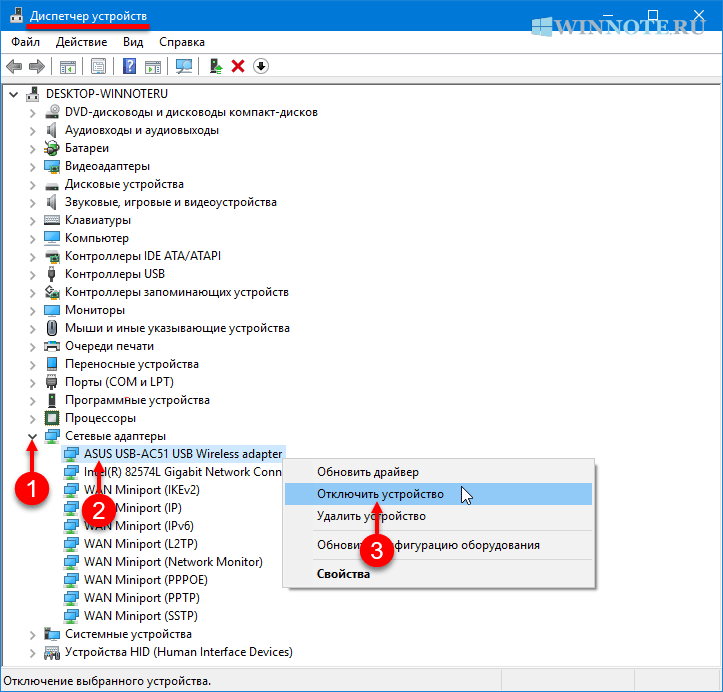
In the window that appears, confirm disconnecting the device by clicking the Yes button.

To enable the network adapter, in the Device Manager window, expand Network adapters, then right-click on the disabled network adapter and in the context menu that appears, select Turn on the device

How to enable or disable a network adapter using Windows PowerShell
The first thing to do is to find out the name of the network adapter, to do this, as an administrator and run the following command:The Name line displays the name of the network adapter. Remember the name of the network adapter you want to enable or disable (in this example ethernet).

To disable the desired network adapter, run the following command in the PowerShell console:
Disable-NetAdapter -Name" Network adapter name-Confirm:$falseReplace Network adapter name in the command above with the actual name of the network adapter you want to disable (eg Ethernet). In this example, the command looks like this:
Disable-NetAdapter -Name "Ethernet " -Confirm:$false

To enable the desired network adapter, run the following command in the PowerShell console:
Enable-NetAdapter -Name" Network adapter name-Confirm:$falseReplace Network adapter name in the command above with the actual name of the network adapter you want to enable (eg ethernet). In this example, the command looks like this:
Enable-NetAdapter -Name "Ethernet " -Confirm:$false

How to enable or disable a network adapter using the netsh utility
This method uses utility commands command line netsh (network shell - network shell) which allows you to display or change the computer's network configuration.
First of all, we need to find out the name of the network interface, for this, on behalf of the administrator and run the following command:
netsh interface show interface
Remember the name of the network interface to be enabled or disabled (in this example, Ethernet).

netsh interface set interface "Interface name" disableReplace Interface Name in the command above with the actual name of the network adapter you want to disable (eg Ethernet). In this example, the command looks like this:
netsh interface set interface "Ethernet" disable

netsh interface set interface "Interface name" enableReplace Interface Name in the command above with the actual name of the network adapter you want to enable (eg Ethernet). In this example, the command looks like this:
netsh interface set interface "Ethernet" enable

How to enable or disable a network adapter using WMIC commands
This method uses toolkit commands Windows controls.
First, find out the index number of the network adapter, to do this, on behalf of the administrator and run the following command:
Remember the index number of the network adapter (in this example 8 )

To disable the network adapter, run the following command:
wmic path win32_networkadapter where index=Index number call disableReplace the Index Number in the command above with the actual number of the network adapter you want to disable (eg 8 ). In this example, the command looks like this:
wmic path win32_networkadapter where index=8 call disable

To enable the network adapter, run the following command:
wmic path win32_networkadapter where index=Index number call enableReplace the Index Number in the command above with the actual network adapter number you want to enable (eg 8 ). In this example, the command looks like this:
wmic path win32_networkadapter where index=8 call enable

When operating system reinstalled, the user may encounter the problem of a missing network driver. Without this driver, neither wireless nor wired network can run. If you have a disk, there are no problems, just install the program. And in its absence, you need to find, for example, a mobile phone / tablet with a connected network in order to download the driver. To avoid such problems, when reinstalling the operating system, you must follow the correct algorithm of actions.
The driver is the link between the operating system and the internal components of the computer, that is, this program connects the OS to the motherboard, video and network cards, office equipment. These programs are developed by the same companies that produce PC hardware and electronic office equipment that the personal computer interacts with. When buying a computer, the user does not think about various drivers, since they are already pre-installed in the system. But, for example, after the first reinstallation of the OS or the purchase of a new computer, the user will be faced with their absence.

If there is no driver for the network on the computer, there is no way to go online and download from official sites that will automatically scan the operating system and install all missing drivers. When can you run into a problem installing a network device driver? In these three cases:
- Even on a new, just from the store, computer, the operating system may be missing, and as a result, the driver.
- When the operating system is installed/reinstalled.
- When a system failure occurs and the driver stops working.

Because in Lately As users increasingly assemble computers themselves (choose internal components), a DVD drive may be missing, and as a result, it is not possible to install any driver from a disk.
In this regard, we can advise you to keep the full set of drivers in a separate folder on your PC or download them to a flash card. In this case, you don't have to search mobile device to go to the official pages of manufacturers' websites and from there download a program that will automatically install the missing drivers.
Installing the network driver
Before installing the driver, you must identify your computer. All brands and models of internal computer hardware are encoded with special "ciphers". This is done so that during installation the driver can identify the computer model and its manufacturer. The network device driver code looks like this: PCI/TECH_xxxx&DEV_xxxx&SUBSYS_xxxxxx. TECH means that the hardware for the computer was made by A4Tech, and DEV is the device ID.Step 1. Hardware identification
In order to find out the code, click Start, enter device manager in the search field. Next, a menu will open with which you can identify the equipment. Press " Network adapters» and select the name of the controller.
Once you do this, the Details section will open. Find their "Properties" and select "Model ID". The first line contains complete information about the device model.

Step 2: Install/Update Network Adapter Driver
This will be the identifier of your equipment. Now you need to find it on the Internet by entering the name in any search engine, for example.The search engine will give the official driver page, and you need to download it to your PC. Then comes the installation process itself. If you need to update a network device driver, you do exactly the same: find the ID, enter it in the search, download and install.
To install a missing or latest version of the driver, use the "Device Manager". Do the same for the last step Update drivers».

Select "Search for driver software on this computer".

Go to the folder where you saved the necessary drivers downloaded on the official website of the manufacturer, and install them using the "Next" button.

Many users, before installing new versions of drivers, remove the old ones in order to avoid conflict and inoperability, because even if you did everything correctly, the Internet may not appear on the computer. In this case, you still need to take the advice of users and remove the old versions.
How to do it! In Device Manager, you can uninstall old version network driver. Agree with the choice, and the system will remove the network device driver that was previously installed on your computer.

There are two steps left and your computer will work fully. Step one - reboot and open Device Manager. In place of the removed driver will appear " network controller" In chapter " Other devices».

At the final stage, follow the steps from (updating/installing network device drivers).
When setting up a new router to work with a Windows 8.1 computer, I found that no matter how many times I configured the network adapter's IP address settings in Windows, the settings returned to "Obtain an IP address automatically". Obviously, this was a sign that some network adapter settings were corrupted. Therefore, the only solution is to manually remove the corrupted settings Windows Registry and restore the new settings. Here's how to do it:
Step 1 - Reinstall the network adapter in your PC
- Use the Win+R keyboard shortcut to open the Run dialog.
- In the Run dialog box, type devmgmt.msc and press Enter. The Device Manager window will open.
- In the Device Manager window, you need to select your network adapter, then right-click on it and select uninstall.
4. After it disappears from the device manager, click on the refresh hardware configuration button - the icon in the toolbar to rescan the network adapter and install drivers for it.
5. If you are using third party drivers for your network adapter, then you will need to reinstall or update those drivers by downloading them from the Internet or using the included CD.
Step 2 - Clear Settings in the Registry
1. Use the Win+R keyboard shortcut to open the Run dialog.
2. In the Run dialog box, type regedit.exe and press Enter. This will open the Registry Editor window.
3. In the registry editor, find and open the HKEY_LOCAL_MACHINE\SYSTEM\CurrentControlSet\Control\Network key

4. On the right side, select the configuration name value, right-click on it and select delete.
Step 3 - Restore Settings
- Open the Windows Control Panel and select Network and Internet, then Network Center and Sharing.
- On the left, click on change adapter settings.

3.Right click on your network adapter and select properties from the menu.
4. Do not change anything in the "Properties" window. Just click on the "OK" button. This will restore the configuration values in the registry again.

5. Now you can go ahead and change the adapter values as you like. The new values will be saved and the configuration will no longer remain corrupt.


