How to add VKontakte to the toolbar. Customizing the Windows 7 toolbar
Developers from Microsoft, starting with Office 2007, have radically changed the familiar application interface.
Instead of the familiar list of menus, a whole ribbon appeared in Word.
At one time, many copies were broken in disputes about how convenient this innovation was.
But the firm position of the designers of the most popular office suite, which included a similar interface in all newly developed programs, made all the conversations meaningless.
I just had to calm down and learn to work with a new tool.
The ribbon has many customizable options. And one of them is the ability to collapse the menu into a small line when there is no mouse selection.
The function is convenient in principle, but for some it is a source of unnecessary irritation during operation. The ribbon constantly disappears from view; the user has to make unnecessary mouse movements to open it and select the necessary tool.
Knowing the features Microsoft applications, it is clear that to change the parameter you need to check or uncheck the box. Let's look for where she could be.
Let's try right-clicking on the collapsed toolbar.
We now have a context menu that looks like this.

Now if you try to uncheck the “Collapse Ribbon” item, it will appear on the screen and remain there, even after clicking on the free space of the document.
The context menu will look like this.

As a result, the tape does not disappear anywhere, and you can concentrate on preparing the necessary document.
The control panel of any program, browser or OS can be customized individually. For example, the Windows operating system, familiar to many, is not one program, but a whole arsenal of small ones that allow you to work with files, access worldwide network and much more. Users are interested in the question: is it possible, and most importantly, how to add icons to the toolbar?
Add icons to the toolbar. Windows
OS management functions contain settings and a set of tools with which you can change them at your discretion. You can not only change the Start menu itself, but also appearance shortcuts and windows. As for adding new tools, in this case this function is only possible when installing additional programs, whose action is aimed at expanding functionality operating system.
You can also call the Windows toolbar using the context menu by right-clicking on an empty area of the screen and selecting the “Personalization” tab (it should be noted that this function not available on all operating system versions).
By using the DisailowCpl DWORD parameter, you can configure the management interface to show only allowed folders and links.

Software
In case of adding or removing tools in the control panel of MS Office programs, just right-click on the menu bar (where the “Insert”, “View”, “File”, etc. tabs are located) and select the “Panel Settings” function in the expanded window quick access." Next, select the necessary tools for each proposed parameter. There you can also remove those that you rarely or never use. Selected additional tools will appear in the line with command icons. If the number of gadgets being added is greater than can be added to the panel, an arrow will appear on the side, and when you click on it, an additional panel will expand.
Individual control panel settings are provided in all software products, be it a graphic editor or a program for building complex design solutions and control automation tasks.

Internet browsers
In this case, all settings are done through the menu. For example, in the browser Mozilla FireFox When you click on the “Menu” button, a tab appears in which you can manage all elements:
- delete
- move
- add
Don't be afraid to experiment, as you can always restore the original settings by using the Restore Defaults feature.

IN Chrome browser and Opera also provides the ability to customize the control panel and add new tools. To perform the operation, you need to click on the “Browser settings and manual” icon.
Instructions
Turn on your computer. Launch the program you are going to work with. In the top line of the main window, find the Window section and open it.
In the window that opens, you will see a list of all program panels. You can open them by clicking on any item in the list. Find the name of the panel you need and click on it. The monitor screen will display a rectangular window in which the tools are depicted in the form of pictures.
An arrow will appear on the screen. Point it at the panel. You can fix the arrow with the left mouse button on the top field, which is empty. Drag the panel to the place on the screen where it will be most conveniently located. Following this, the program element is visualized on the monitor screen.
Computer Adobe programs Photoshop, Corel Draw, Adobe Illustrator have options for setting up hot keys, with which you can turn on or off any panel. Find the item Window>Workspace>Keyboard Shortcuts & Menus, in the new window click on Keyboard Shortcuts. In the Shortcutsfor drop-down window, the Application menus item must be activated. Check if this is true. Open the Window tab. Click on the item for which you will set hotkeys. An empty window will open on the right, in which you should enter the name of the selected key.
note
Only the F1 - F12 keys, as well as the Ctrl+ combination, can be used as hot keys capital letter in Latin layout.
Try a few places on the screen where you can drag the panel. Perhaps there is something more convenient for you than what is provided by the program.
Sources:
- About menus and toolbars
When working with applications, sometimes after accidentally clicking the wrong button, toolbars or menus disappear. This happens especially often when working in an editor. Microsoft Word. These panels are designed for additional user convenience. They provide direct, fast access to the main and frequently used functions of the application. Therefore, you should not rearrange yourself due to the closing of panels and change the usual rhythm of interaction with the program using only the main menu. It is much easier to find and return “runaway” toolbars to their place. This is easy to do by customizing the appearance of the application.
Instructions
The program will automatically open this panel in the main application window. After installing all the required panels, exit the settings window by clicking the “Close” button.
Video on the topic
There is a toolbar in almost every computer program. Its main purpose is to quickly execute (with one click) the most frequently used commands.

The toolbar is a graphical user interface element. It is designed to place several icons on it in order to simplify work with the program. Typically, the panel is a rectangle located in a vertical or horizontal position, which contains the following elements: buttons, menus, a field with an image (both static and dynamic, for example , clock) and text, as well as drop-down lists. Icons located on the toolbar in computer programs, call up the most frequently used functions, as well as those accessible from the window menu. In order to use any icon responsible for a particular function, just double-click the left mouse button (the arrow is directed to the image of the required element). The functions of the elements located on the panel are indicated by text or signs. In the case where there are a lot of icons and it is impossible to fit them on the panel, they can be added both as menus and scroll buttons. In some computer programs (for example, in graphic editors) toolbars can be easily detached from windows and attached to each other for maximum user convenience. Also used are panels, which are separate windows (usually present in the standard set of desktop environment programs). They are not attached to specific application, are located along several desktop borders or one. On such a panel there is dynamic list buttons (a set of functions available through the header: “collapse”, “expand”, “close”); drop-down menu (list of open windows, ready for use at any time); menus and buttons for launching programs.
Video on the topic
On control panels collected the basic settings of the operating room Windows systems. Updating the system and choosing a theme, screen resolution and firewall settings, disabling unused services and much more - all these operations are performed through the control panel.

Instructions
There are several ways to open Control Panel in Windows XP and Windows 7. The easiest option is through the main menu. Click Start, then select Control Panel. In the window that opens, you can select any settings you are interested in.
Most users of the Windows operating system use to work with files Windows windows, in which files are deleted, copied or moved.
If you are one of these users, you probably use the so-called Toolbar, which is present in all Windows windows.
This panel is usually located immediately below the main menu of the window, and you can easily recognize it by the control buttons located on it:

But not every user (especially a beginner) knows that this panel can be customized “for themselves.” For example, you can add new buttons.
To do this we need to see what buttons are available to us. To do this, right-click on the toolbar and from the menu that appears, select Customize... (Customize).
In the window that appears, you can see a list of available buttons (on the left side of the window) and a list of already installed buttons (on the right side of the window). If you want to add a button to the panel, click on it, and then click on the button Add located in the central part of the dialog box:

After adding all the buttons you need, just click the button Close to close this dialog box.
If after this you suddenly realize that there are too many buttons on your toolbar (and they don’t fit), then you can reduce their size. To do this, right-click on the toolbar again and select the item from the menu that appears. Customize... (Customize). Next, in the same window that appears, from the drop-down menu Icon options select item Small Icons and close this window again:

Now you can see that the buttons on your toolbar have become smaller and there is more free space on it!
In addition, you can change the order of these buttons (in the same window), highlighting required icon and pressing buttons Move Up And Move Down.

In order to organize the buttons the way you like, you can divide them into groups using special separators:

To do this, find a button with the name on the left side of the dialog box already familiar to us Separator, and add it to the right side, then move it to the right place:

When the toolbar is not large enough to accommodate all the buttons, small black arrows appear on the right side of the toolbar. If you click on them, a menu will appear with buttons that do not fit on the screen:

To get rid of these arrows, you can stretch the window (or shrink the buttons if you haven't already).
Well, if as a result of your experiments the control panel has turned into something terrible, then you can always return it to its previous form. There is a very useful button for this Reset, which returns the toolbar to its original form:

Once you've customized your toolbar, you can lock it so you don't move it or accidentally mess something up (it happens)! To do this, right-click on the panel and check the box Lock the Toolbars.
The taskbar is one of the main mechanisms for managing and interacting with the system in Windows. Therefore, the comfort of your work with the OS and the computer as a whole will directly depend on its configuration and the settings of those important elements that are located on it.
Task bar
To go to settings Taskbars And start menu you need to right-click on Start button in the lower left corner of the screen and in the opened context menu select item Properties. After this, a window will open in front of you Taskbar and Start menu properties, the component settings of which we will consider.

By the way, you can also access taskbar settings from Control panels by clicking on the item with the self-explanatory name Taskbar and Start Menu.
The taskbar and Start menu window contains three tabs: Task bar, Start Menu And Toolbars, which are responsible for setting the parameters of the corresponding Windows components.
Customizing the Taskbar and Notification Area
At the top of the tab there are settings that are responsible for the design and display of the taskbar.
Pin the taskbar . By checking this box, you can fix the taskbar on the monitor screen in the place where it is currently located. In this case, it will be impossible to stretch, move or collapse. As a rule, this item is checked by default. If you want to increase the height of the taskbar (when located at the top or bottom of the screen) or its width (when located on the left or right of the screen), and also change the size of the notification area and toolbar, then uncheck this item. After this, you can perform all the operations described above by dragging the boundaries of the desired areas with the mouse.
Automatically hide the taskbar. Activation this parameter will allow you to use the maximum desktop area when working, since the control panel will be hidden and will no longer be displayed on the screen on top of all windows. To open the panel in this mode, you need to move the mouse cursor to the edge of the screen along which it is located.
Use small icons. This option allows you to make program icons smaller and open applications located on the taskbar. In this way, you can expand the workspace and increase the number of displayed elements on the panel itself.
Position of the taskbar on the screen. Allows you to select from the drop-down menu where the panel will be placed on the screen. You have four options: Bottom, Top, Right or Left.
Taskbar buttons. At this point you can choose how icons will be displayed on the taskbar running programs and open windows:
- Always group, hide labels. This mode is activated by default and allows you to expand free space on the taskbar due to the fact that icons of similar open applications are grouped, and the icons themselves do not have labels of their names. For example, if you have several Explorer windows open at once, they will be grouped into one icon on the taskbar, which will be displayed as several rectangles superimposed on each other.
- Group when taskbar is full. Unlike the previous option, this mode is more informative for the user. All icons for open applications are located separately on the taskbar and are labeled with the names of the windows in which they are running. Icon grouping occurs only when the taskbar is full and there is no free space to accommodate new icons.
- Do not group. Grouping icons open source software does not happen under any circumstances.
In the middle of the Taskbar tab there is an item Notification area , which is responsible for configuring the display of system icons and background program icons, as well as their messages in the notification area (tray).
After clicking on the Settings button, a window will open in front of you with a list of all background and system applications, next to which you can select their behavior in the tray from three available options:
- Show icon and notifications
- Hide icon and notifications
- Show notifications only

Below the general list of all icons there are items Turn system icons on or off(Clock, Volume, Network, Power and Action Center), as well as Restore default icon behavior. You can also activate the option Always show icons and notifications on the taskbar.
And finally, in the lower area of the tab we are considering there is an option setting Desktop previewusingAeroPeek. Activating this function allows you to hover the mouse cursor over the button Collapse all windows, perform quick temporary viewing of content Desktop. In this case, open windows do not collapse, as happens when this button is clicked, but become transparent.
Customizing the Start Menu
Let's move on to studying the next tab of the window with a self-explanatory name Start Menu. As you probably already guessed, here are the options responsible for setting the parameters of one of the key components of Windows system management, which is called up using the button of the same name located at the very beginning of the taskbar.

The appearance of the Start menu and the elements of which it consists, as well as the behavior of objects and icons in it, is influenced by a lot of parameters that simply would not fit on this tab. This is probably why the developers put them in a separate window, which opens after pressing the button Tune. We'll talk about this a little later, but for now let's return to our tab and look at the few parameters that are still located on it.
Power button action . Using this item, you can configure the system action that will occur after you press the physical power button located on the computer case. To do this, you must select any of six options from the drop-down menu:
- Shutdown- leads to the complete closing of all programs, logging out and shutting down the computer. This action is set by default.
- Change user- causes the user to log out to the selection screen account without closing running programs.
- Ending a session- causes the user to log out of the system to the account selection screen and close all running applications.
- Locking your computer- leads to blocking of the system without closing running programs. To resume operation, the user will need to enter a password. - leads to closing all applications, logging out and restarting the computer.
- Dream- puts the computer into a low power state. At the same time, all parameters of the current work session are saved, which allows you to quickly resume work in the future.
Confidentiality . This option contains two items that allow you to show or hide recently opened programs, files or documents on the left side of the Start menu. Everything is simple here - if the checkboxes are checked, then display is allowed, if unchecked, it is prohibited.
Now let's look at the options that are contained in the window Customizing the Start Menu called by the above button Tune.

This window contains quite a lot of settings, but there is no point in considering all of them in detail. Many points have self-explanatory names and do not need any additional comments, but we will still make small explanations about some.
Most of the Start menu settings concern the display of thematic themes in it. custom folders and menus, including: Videos, Music, Documents, Homegroup, Games, Images, Personal Folder, Favorites, Recent Documents, TV Recordings and Downloads, as well as the main controls: Administration group, Run command, Computer, Control Panel , Network, Connect to, Default Programs, Help, Devices and Printers.
Depending on the menu item, several display options can be applied to it:
- Don't display this item
- Display as menu- the group will be displayed on the right side of the Start menu as a folder with an arrow that opens automatically when you hover the mouse cursor.
- Display as link- the element will be displayed on the right side of the Start menu as a regular link, after clicking on it, a new window will open with the contents of the folder of the same name.
Highlight recently installed programs . If this option is checked, the system in the Start menu and the All Programs group will highlight new (recently installed) applications and the folders in which they are contained in dark yellow.
Search other files and libraries . An item that allows you to expand the search locations for the necessary information or speed up the search process itself by disabling scanning of public folders.
Search Control Panel programs and features . When this option is activated, you will be able to search for the desired objects in Control panels systems.
Large icons . Unchecking this item will reduce the icons of the most frequently launched programs, the list of which is located on the left side of the Start menu. This will increase the number of applications displayed in this list.
Allow context menu and dragging of objects . Activating this parameter allows you to call up the context menu of Start menu objects, as well as drag them with the mouse into various work areas of the system. For example, you can drag a program icon from the Start Menu to the Desktop or, conversely, add a link to an application to the Start menu by dragging an icon from any open window there.
In addition to the parameters discussed above, at the bottom of the settings window there are two more elements with which you can adjust the size, or rather the height, of the Start menu. They regulate the display of the number of positions in lists of recently used programs and items.
Customizing Toolbars
As in previous versions operating systems, in Windows7, the ability to work with toolbars has been implemented, which are used to quickly launch program components and access resources.
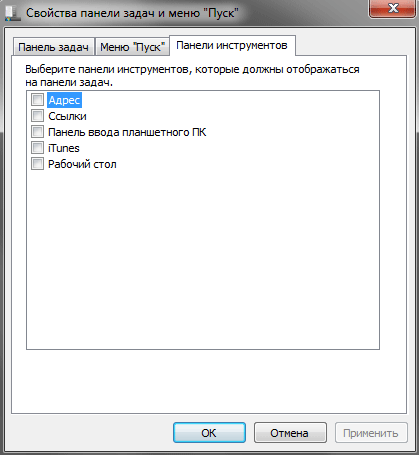
Initially, the system includes only a few standard toolbars: Address, Links, Tablet PC Input Panel and Desktop. But as new applications are installed, the list of these panels will expand. For example, in our case, you see an additional iTunes panel appear.
You can also create your own toolbars yourself. To do this, right-click on an empty space on Taskbars and in the context menu that opens, select Panels and then the command Create a toolbar V.
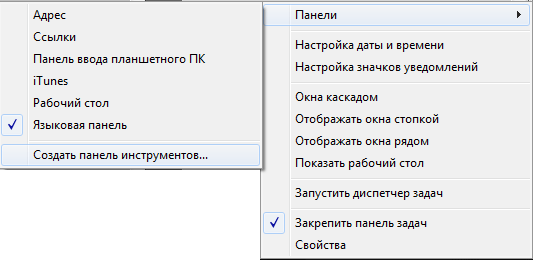
Controlling the display of toolbars is carried out at an intuitive level. To do this, just uncheck or check the box next to the desired panel and press the button Apply.
-
 April 17, 2015Original and alternative interface: to flash or not?
 -
 April 17, 2015Motorola Moto X Force - detailed review of specifications
 -
 April 17, 2015What to do if your iPhone is stolen

.jpg "From numbers to notes: the best portable DAC Big in small")


