Is it possible to install android. Copy ISO file to USB drive
Is it possible to install Android on a netbook? Yes, it's possible. Moreover, this mobile operating system works amazingly well on any Windows device, including desktop computers. It's free, unlike Windows or Mac, and it's sleeker and easier to use than Linux.
Android is an OS aimed at smartphones and tablets that is mobile operating system predominantly. Therefore, it may seem strange to have it on a laptop or netbook, but this does not mean that it is impossible. The main reason why Android often does not work on such devices is related to the hardware. Most netbooks and mini-laptops are powered by Intel or AMD processors, which are designed specifically to run on the x86 instruction set. Android, on the other hand, was designed with mobile device processors in mind using
However, in Lately Devices with ports running on x86 are appearing, and some users can use the Android OS as a secondary operating system on laptops. This is mainly done in order to have access to thousands of Android applications available only in the Android Market.
Android OS on a netbook or smartbook
There is a class of devices (very rarely used these days) called smartbooks. They were intended to run Android and other software With open source and featured functionality associated with mobile devices: excellent connectivity, portability, long lasting battery life. All this was housed in one device, which cost much less than a netbook or laptop.

Smartbooks have been pushed out of the market by netbooks and tablets, but some models are still in use. In fact, they are and mainly contain applications specifically designed for smartphones and tablets. But, since they are quite rare today, you should figure out how to install Android on a netbook or laptop.
Convenience in functionality
It's worth noting that Android is designed to use less power than Windows. For this reason, it offers rather mediocre performance. The power of this shell is not designed for playing HD videos or games, but it is quite suitable for browsing the web and working with entertainment applications. According to user reviews, this operating system is very convenient for solving simple tasks.
Ready netbook on the Android system
As already mentioned, the era of smartbooks is coming to an end. The most famous gadget with a mobile OS can be called Toshiba AC100 - a 10-inch netbook running on Android 2.2 and a Tegra-class processor. It is currently on sale and has 32 GB internal memory and 512 MB random access memory. In principle, with such indicators it can be used for simple work and entertainment. Its significant advantage is that it can work on a single charge for about 8 hours, and also comes with HDMI port. You shouldn't try to use it for productive work, but for simple surfing the Internet and light games it is quite suitable.

Other manufacturers also released a range of smartbooks at one time. At the same time, the developers went a little aside and began making new generation devices. Yes, today you can find a Samsung netbook on Android, but this is already a transformer. At its core, it is a tablet that comes with a docking station and a keyboard. This device looks and works just like a netbook, which has received rave reviews from users.
Modern models even allow you to connect a mouse to a tablet, thereby creating an almost identical user experience.
However, to find such a Samsung or Asus netbook on Android, you will have to search for a very long time. As the reviews suggest, most people prefer to purchase either a tablet (which will have light touch input) or a netbook (which comes with a full-sized keyboard and will run a full-fledged “desktop” OS). However, given that Android OS is now adapted to work with Intel or AMD processors, it can offer a worthy alternative to Windows.

Can I install it myself?
Currently, you can install Android on a netbook by downloading and installing it as a second additional OS on your computer. This can be done using tools like unetbootin, which allow you to
To do this, take a 10-inch netbook (Asus Eee PC is the most popular among them) and download any version of Android onto it yourself.
As noted above, Android market is very big these days and most of the apps you prefer to use on mobile devices, will work exactly the same on your netbook. Of course, you'll lose touchscreen capabilities, but you do get a keyboard, touchpad, plenty of USB ports, and a micro-SD card slot. This sounds very attractive, so if you have a netbook, it's definitely worth trying to install Android on it. How to do this?

Download "Android" to your main computer
The first thing you need to do is visit the page Android downloads x86 and select the correct ISO file to download. New versions are at the bottom of the list. This article provides an example with version 4.0. It can be found in the section called “Android platforms x86-4.0-RC1”. You will be offered several different options, so try to choose the one that suits you best. For example, there is an option “netbook ASUS Eee PC family", which will be recommended for netbooks of this brand. The installation process is easy and not very lengthy, so don't be afraid to try installing a different ISO later if the first one doesn't work. Just download the file on whatever computer you're using - the device doesn't have to be the same one you want to install Android on.
Copy ISO file to USB drive
Once you have the downloaded ISO image, you will need to transfer it to your netbook. Since most gadgets do not support CDs, the most The best way- download a tool called Unetbootin Help. After downloading it, simply run the file and you will see a screen with the program's interface.

Click on the three dots button on the right side of the window and select ISO file, which you downloaded. Then select the drive you want to copy the ISO to. Wait for all the information to download to the USB drive you selected. Make sure you copy everything you want to keep!
Once the download is complete, click OK. A pop-up window will appear briefly showing a horizontal bar of the file being downloaded, and then once the operation is complete you will be informed and asked if you want to restart your computer. Click "no" and remove the USB drive.
Prepare the netbook for installation
Now that you have saved the ISO file to USB, you are almost ready for the process of installing Android on your netbook. If you have any files on your hard drive that you would hate to lose (such as photos, documents or videos), be sure to save them on a flash drive. Even though data other than boot disks should be saved, there is always a risk that something will go wrong, so it is better to take all safety precautions.
Connect the USB drive to your netbook. You will need to press one key (most likely Delete or one of the F keys, i.e. F1) to select the device from which to boot. Here you need to select a USB drive from the list. If you are unable to get to the boot menu, you will need to go into the BIOS and change the boot order - set it to one in which the USB drive will be displayed before any other device. After this, you can directly proceed with the steps of how to install Android.

Set boot process
Once you have set your boot order and inserted the USB, you can boot the installer from graphical interface for Android for x86. This menu will give you the option to download Android 4.0 directly without installation, and you can try using this OS right away. However, if you want to install the mobile operating system permanently, this step is optional.
At this stage, you will have to select the disk where Android will be installed on the netbook - you can select any partition in ext3/ext2 (Linux) or NTFS/FAT32 (for Windows). You shouldn't format (or even wipe) the drive you install the shell on, but it's still worth saving backups files.
Once you have selected the drive, you will be asked to select the partition size to install. Move forward through the menu and select the maximum size (which is usually 2048 MB). This will take some time, depending on the speed of your hard drive. You will also be able to create a virtual SD card at this time, and after that you will be prompted to restart your computer. Do this and don't forget to take it out USB disk when the netbook turns off.
Direct installation process
Now you should download the installed Android OS onto your netbook. Select the first option in the boot menu and your netbook will start running Android. Initially, you'll see white text on a black background followed by a glowing Android logo, and then finally the OS itself will load and display a screen that says "Welcome." You will be prompted to connect to wireless network, sign in to your Google account, and some other basic questions (about the current time, etc.) will also become available. After entering these options, the download is complete and you finally get to your Android desktop. The model of your gadget does not matter at all - Android is installed on an Asus netbook in the same way as on a Samsung, Acer, and so on.
Settings and options "Android"
Once the shell is downloaded and functioning on your device, you should understand it and install several unique useful applications. Such services are constantly updated and supplemented, so stay tuned for news.
Of course, the netbook doesn't have a touchscreen, but Android still supports touchpads, keyboards, and USB connections. Once you install Android on your netbook, you can use docking stations and add-ons at your own discretion - restrictions may be imposed solely by the features of your device. What other benefits can you find?
Financial benefits and no licenses
Everyone knows that Microsoft requires hefty licensing fees for the use of its operating system. Windows systems, while Google doesn't offer any fees for Android. Operating on Android will help you save on both your own maintenance and the downloading of various programs.
Screen appearance and interface
Getting used to the interface may take some time for those who are used to working on Windows all the time. We can say that this is one of the main reasons why many are in no hurry to change the OS on their device. Currently, Android is actively developing, and each new version looks more beautiful and pleasant, which cannot go unnoticed. Google is trying to withstand competition and therefore is constantly looking for new advantages over Microsoft. Of course, today it is too early to talk about complete victory in this fight, but some prerequisites for success are evident.
Easy to use
Netbooks are intended primarily for small and short-term work, so a simple OS is much better and more harmonious. Windows can be difficult to use, requires constant updates, and some features are completely useless for users who just want to surf the web and write messages. e-mail. As a rule, high functionality and great capabilities are required for the operation of large stationary devices.
In turn, the Android OS on a netbook, reviews of which talk about its convenience, can simplify the computing process thanks to a simple user interface and online applications (for example, Google documents). Google services were practically created in order to be simple working tools and gain popularity among ordinary users. An additional bonus is the large number of games available completely free of charge.
The popularity of the Android operating system is growing every day, which is explained by the availability of access to unique content from Google Play, a large number interesting applications, games, high system performance and a minimum number of malicious objects that are written specifically for this OS. Therefore, users often ask the question: how to install Android on a PC without losing the data of the second system?
Preparing your computer for installing Android OS
Before you install Android on your computer, you need to create a boot disk. To do this, download any suitable software from this section, for example Alcohol 120%, DAEMON Tools or UltraISO and install it on your PC.
Now download any version of Android OS that you want to install.
After downloading the installation file, launch the software to create boot disk. IN in this example will be the UltraISO used. Launch the program, click “File”, “New”, “CD/DVD image with data”. Add the file and click Write.
If your PC has one hard drive, you need to create a separate partition on the HDD. To do this, you can use Acronis Disc Director Suite or download MiniTool Partition Wizard.
Launch Acronis Disc Director Suite, select the disk on which the new OS will be installed and click “Create partition”.

A new window will open. Enter the name of the partition, then select “File system”, click “Create as” logical disk, indicate the disk size and click “OK”.

The section has been created.
Installing Android OS on a computer
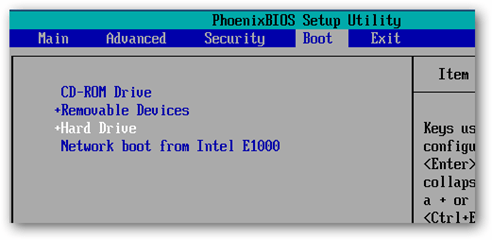
Reboot the PC and go into the BIOS by clicking F2 or Del a couple of times. Go to the Boot section and select Boot Device Priority. A list will appear with options for selecting boot devices. Select your drive.

In the next dialog box, the system will prompt you to select a partition to boot. Typically this will be sda1 and sda2. Select the first one if you made a partition on drive C.
Now you need to select the file system type. For Android, ext2 and ext3 are acceptable. A type such as NTFS is not supported by the OS, and FAT32 is not recommended.

After selecting the file system type, you must accept a special bootloader. Without which Android will not boot. Click “Yes” and click “Enter”.

After OS determine installed version system, and will also offer to integrate a universal bootloader for both OSes. Click “Yes”, since this operation is very important. With its help, you can select the desired system at the start of your computer.

The system installation process will begin.

Upon completion, the system will offer to launch Android on your PC.

If all actions are performed correctly, problems with system performance should not arise.
New in version 8.1-r1 (Oreo-x86) (15.01.2019)
First stable release of Android-x86 8.1
- Supports both 64-bit and 32-bit kernel and userspace with the latest LTS 4.19.15 kernel.
- Support hardware acceleration OpenGL ES 3.x for Intel, AMD, Nvidia and QEMU (virgl) from Mesa 18.3.1.
- OpenGL support ES 2.0 via SwiftShader for software rendering on unsupported graphics devices.
- Support for hardware accelerated codecs on devices with the Intel HD and G45 family of graphics processors.
- Supports UEFI secure boot and installation to UEFI disk.
- Added text interface installer.
- Added theme support to GRUB-EFI.
- Supports Multi-Touch, Audio, Wi-Fi, Bluetooth, Sensors, Camera and Ethernet (DHCP only).
- Auto-mount external USB drive and SDCard.
- Added the taskbar as an alternative launcher that includes the Start menu and recent apps bar at the top of the screen and supports freeform window mode.
- Enable ForceDefaultOrientation on devices without known sensors. Portrait apps can run on a landscape device without rotating the screen.
- Arch application support via native bridge mechanism. (Settings -> Android-x86 Options)
- Support for updating from unofficial releases.
- Added experimental Vulkan support for new Intel and AMD GPUs.
- Mouse integration support for virtual machines, including VirtualBox, QEMU, VMware and Hyper-V.
New in version 7.1-r2 (Nougat-x86) (02.05.2018)
- Updating grub-efi 64-bit to version 2.02 to fix the "malformed file" issue.
- Fixed high system_server load due to the keyboard position sensor (kbdsensor) on some devices.
- Fixed Google Play Services crash caused by i965 driver.
- Improved compatibility with some applications.
- Fixed some memory leak issues.
- Fixed a display issue associated with using the old boot method in Hyper-V.
- Added qxl support to the qemu-android script.
- Fixed getSupportedPreviewFpsRange exception.
- Kernel update to version 4.9.95.
New in version 6.0-r3
- Automatic CD/DVD mounting
- Fixed VMware issue found in 6.0-r2
- Added qemu-android script to run Android-x86 in QEMU
- Update to Android Marshmallow-MR2 release (6.0.1_r79)
- Kernel update to version 4.4.62 with new patches from AOSP
- Updating Mesa to version 17.0.4
- Update related projects (libdrm, ntfs-3g, exfat, bluez)
New in version 5.1-rc1
Version 5.1-rc1 is based on Android 5.1.1_r24. Added x86-specific code sections and fixed stability and smoothness issues.
Main functions:
- Support for 64-bit kernels and 32-bit systems;
- OpenGL ES hardware acceleration support for Intel / AMD (radeon / radeonsi) / Nvidia (nouveau) chipsets;
- Support UEFI boot and UEFI disk installation;
- Added the ability to install ext4/ext3/ext2/ntfs/fat32 file systems using a text installer;
- Supports multi-touch, audio, Wi-Fi, Bluetooth, sensors, camera and Ethernet (DHCP only);
- Automatic mounting of external USB drives and SD cards;
- Support for virtual machines, including Qemu, VirtualBox and VMware;
- Support for third-party architectures (arm/arm64) using its own bridge mechanism.
New in version 4.4-r5
Android-x86 4.4-r5 includes fixes for bugs found in version 4.4-r4. Problems with hazi fonts in the Mesa 10.5.9 graphics library have been resolved on graphics Intel processors 5-generation.
Android-x86(formerly known as “patch hosting for android x86 support”) is a free and open source project source code, designed to run Android OS on systems with x86 processor architecture.
In fact, this is a project to port Android open source project (AOSP) to the x86 platform, proposed by by Google for free use.
Android-x86 allows users to use the Android OS on laptops and desktop computers.
Application
Android-x86 allows you to run and work with the Android OS on devices based on AMD processors x86 / Intel (not on ARM chips). The program is not officially sponsored by Google. Android-x86 will be an excellent choice for users who want to install an alternative OS on a Linux-based computer.
Android-x86 review
Installation
Android-x86 contains two files. The ISO file can be booted on any device by selecting the boot mode in the BIOS. The EFI image can be used on modern systems with UEFI firmware. Select the file that is appropriate for your hardware type. After loading, a screen will open where you can select the option to start a “live” session, i.e. without the need for installation, or an option with product installation. Android-x86 can be installed on USB drives, which saves major disk space. The software installation process is very simple. The only problem is the lack of support for formatting partitions with file system ext3.
Ease of operation
Android-x86 is characterized by high performance on any computer. When using the program for the first time, you will need to create or log in account Google. Even if there is a login error, it will be loaded pure android. As a result, you will be able to browse websites on the Internet using the built-in Android browser. You will also need to configure Wi-Fi network. A ring-shaped mouse cursor is used to navigate and simulate clicks. Some navigation functions require the use of keyboard keys. With Android-x86 you can access the store Google applications Play, Android settings and Google Chrome to personalize the new OS.
The program includes two home screens and 6 background images. Both home screens contain a Google search bar and an icon for voice input request. The panel at the bottom of the screen contains the familiar Android keys “Home,” “Back,” and “Recent Apps.” Just above there are buttons for quickly launching YouTube, a standard application for SMS correspondence, Google Music, a browser and a button for launching the application panel.
Advantages
By running Android on all devices, you can have fast access to applications, settings and Google services. Android-x86 allows you to organize this instant access without much difficulty. The new version of the product has become even more intuitive and easier to learn. It works faster than the previous ones Android versions on dedicated equipment. Use the solution on various devices: From netbooks to tablets - you will be surprised by the high performance. Hardware acceleration technologies are now available for Vmware and Nvidia chips. IN new version Support for GPS sensors has been added.
Flaws
Some users have reported problems using the suspend and resume feature, while others have complained about limitations associated with using only the stock Android browser.
In some cases, when using a live session, the browser may not start and an error message will appear. In many cases, a simple reboot will resolve the problem. Sometimes users report that the program does not start at all, in other cases they report systematic failures. To temporarily resolve such problems, restart your computer. The developers should fix these bugs in the future.
Conclusion
Android-x86 is good tool to smoothly run Android OS on a laptop or desktop computer based on AMD x86 / Intel processors. However, many users will not like possible problems stability. It is recommended to wait for the release of a new version of Android-x86.
Do you want to try the Android operating system on your desktop computer or netbook? Today we will tell you how to run Android from a USB drive and see how fast Android will run on real hardware.
InstallationAndroid onUSB disk or memory card
First, make sure that the flash drive or memory card inserted into your computer is about 256 MB or larger. Then you need to format the memory card.
Now, you are ready to download and Android installation to your drive. Let's go to the Android x86 download page (link below), scroll down the page to the StableRelease section and click on the link "View" under android-x86-1.6-r2.iso. This will start downloading the ISO file to your computer.
In the meantime, let's go to the UNetbootin website (link below) and download it too.

Once the download is complete, launch UNetbootin. Check the box “Disk image”, and then click on the button “…” and select the Android ISO file you just downloaded. Finally, select the correct flash drive or memory card at the bottom and click on the button “ OK".

UNetbootin will start copying files to the flash drive. This may take several minutes, depending on the speed of your flash drive.

As soon as this operation is completed, you will be prompted to restart your computer. If you want to start Android then you can click on the reboot button, otherwise just click on the exit button.

If you want to try running Android from a CD/DVD, you can simply burn the ISO to a disc and boot from it. But while almost all desktop computers have CD-ROM drives, netbooks do not always have them. If you do decide to burn Android to disk, you can do this with any program that supports burning ISO files, for example Ultra ISO.

Usagex86 on your computer
Now we are ready to run Android on a netbook, laptop or desktop PC. Simply restart your computer and then boot from the USB flash drive. Not all computers automatically boot from USB devices, so you may have to press F2, F10, or another key (depending on your computer) and change the boot options in the BIOS.
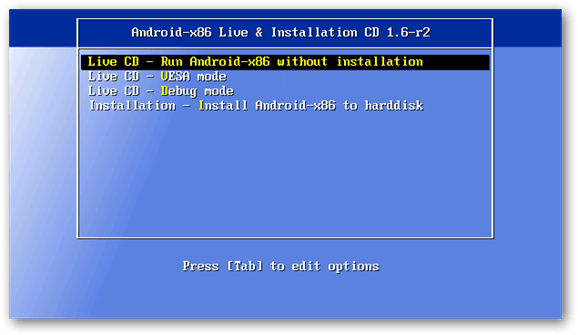
Now, when booting from a USB drive, select “Live CD – Run Android-x86 without installation” .
For a few moments you will see a line with text. This means Android has started loading.

Then, you will see the Android loading screen.

In a couple of seconds, you will see a working Android desk...on your laptop or desktop! You can quickly access one of the apps on the Home screen, or open the menu to see even more options.

Press and hold left button mouse to open context menu, for example, to change the background color or to add widgets to the desktop.

Click the right mouse button to open a menu, for example to open a new tab in the browser.
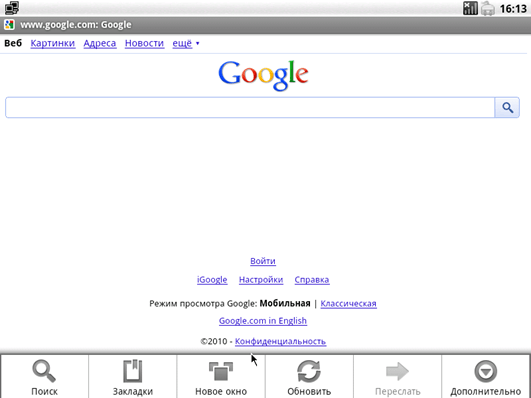
In our tests, the system performed very well. Loading time was only 10 seconds. Android is actually a great alternative Puppy Linux or other lightweight distribution, especially when needed quick way, get reliable Internet access.

Additionally, you can install new applications from using the AppStore, but remember that they will only be installed when the this session Android. Once you restart your computer you will see again standard applications and settings. To prevent this from happening, you need to install Android directly on HDD.
Android x86 supports all hardware, including cameras and Wi-Fi on several laptop and netbook models. Follow the link posted below to check if your hardware is supported. In our case, the camera refused to work, and we also had to connect the Internet via Ethernet because Android did not detect the Wi-Fi card.

For the most part, Android was very responsive, but there were still some lags, most notably the jerkiness of the mouse. Additionally, we were unable to boot Android on a computer with an AMD processor. You can install Android on your hard drive, but we wouldn't recommend it given the limitations and issues you might encounter. However, play around with mobile platform from a USB drive or from a memory card is very interesting.
Conclusion
If you're interested in seeing how Android would run on a real machine, this is a great way to see how fast a mobile OS can be on a netbook or desktop. On real Android computer works much faster than in an emulator, but if you prefer to run Android inside Windows, we advise you to read our article on how to
Thanks to the rapid development of software for the Android OS, many desktop PC users are turning their attention to this platform.
In this connection, a logical question is asked: “How to install Android on a computer”?
Initially, Android was not created for use on PCs with x86 architecture, and versions of this OS up to 3.0 were intended exclusively for phones.
Despite this, a group of enthusiasts has created and regularly creates updated Android distributions for installation on a personal computer.
How to install this “mobile” operating system on your PC will be discussed in this publication.
Steps to install Android OS on PC
All work on installing Android OS on a PC can be divided into several stages:
- Downloading the distribution kit to your computer.
- Creating bootable media.
- Preparing the HDD for Android installation.
- Installation of a new operating system and its configuration.
Now about each stage in more detail.
In order to make your computer a full-fledged Android device, you should select and download the OS distribution.
It is better to do this from the developers’ website by going to: http://www.android-x86.org/download.
At the time of writing, the Android x86 OS distribution kit version 5.1 is available to everyone, but you can use another, more “tested” version of the program.
Screenshot of the page with the distribution kit Android-x86-5.1-rc1.iso
The ISO image you need to download it to your PC and create bootable media.
Create bootable media
You can install Android OS on your computer using optical media or bootable flash drive.
Since most laptop PCs are not equipped with a DVD drive, we will use a regular 2 GB flash drive as a boot disk.
In order to burn the distribution image to USB flash drive you need to use third party software. The developers recommend the UNetbootin or UltraISO utilities.
Let's look at the process of writing a distribution to a flash card using the UNetbootin program:
- Insert the formatted USB flash drive into the PC.
- Download and run the UNetbootin program.
- In the utility window, click “Disk Image”, click on the button with the ellipsis and select the downloaded distribution, by clicking the “Media” button, select your flesh card, then click “OK”.
- When the bootable media creation procedure is complete, click “Exit”
Bootable media has been created.
If you expect to have only Android OS on your PC, then in the BIOS you just need to make your USB flash drive a priority at startup and you can begin the installation process.
If Android is the second operating system on your computer, you should prepare an additional partition on the HDD for its installation.
Creating a partition on a hard drive for Android OS
You can create a partition on the HDD using Windows 7. To do this:
- Press win+R.
- Enter diskmgmt.msc into the dialog box and then press Enter.
- In the utility window, find the unallocated space, select “Create a simple volume” from the drop-down list.
- In the Partition Wizard, click Next.
- Enter the partition size. To install Android on your computer, you need to allocate at least 10 GB of your HDD for this partition. Click Next.
- Set a letter for the new disk partition and click “Next”.
- In the formatting options window, you can leave everything as default. "Further".
- In the window for completing the partition creation procedure, click “Finish”.
BIOS setup
In order to install a “mobile” OS, you need the PC to start with bootable usb Flash cards.
To do this, immediately before turning on the computer, you need to install a USB flash card into the PC connector and enter the BIOS by pressing the F12 or DEL key immediately after starting the PC.
In some laptop models, you need to press the F2 or Esc key to enter the BIOS.
Important! The BIOS entry key may vary depending on the motherboard manufacturer and theBIOS. You can find out exactly the login button from the documentation for your computer.
After entering the BIOS, go to the Boot section where you can use the arrows to set the boot priority from USB devices, then confirm the settings by pressing F10 and exit the BIOS by pressing Esc.
Installing Android OS on PC
After starting the computer from the bootable USB flash drive, a window will open where you will need to select the last line from the entire list.
To install Android on your computer you need to select required section HDD for installing the distribution.
In the next window, the available partitions are identified as sda1, sda2, sda3. Select the one you want and click OK.
Android setup
Almost any user can handle setting up Android OS. The first thing that appears on the PC screen after installing the system is the language setting screen.
Choose the one that interests you.
This completes the initial system setup process. In the window that opens, click OK.
Advice! If you don't know how to behave " mobile system"on your PC, then after starting the computer from the flash drive, in the window that opens, select the first menu item Live CD - Run Android without installation. The system will not be installed on the computer, but will be launched from the media. In this mode, you can always test the selected version of Android before installing it completely.
-
 April 17, 2015Connection to the earth's information field
 -
 April 17, 2015Connecting a hard drive via USB, step-by-step instructions


